> ## Documentation Index
> Fetch the complete documentation index at: https://fillout.com/help/llms.txt
> Use this file to discover all available pages before exploring further.

# Sync file uploads to Dropbox with a form

> Upload file submissions automatically to a Dropbox folder with your Fillout form. Optionally set a dynamic file path to categorize submissions into nested folders.

export const SupportBanner = () => {
  const titleId = React.useId();
  return <div className="support-banner" role="region" aria-labelledby={titleId}>
      <span className="support-banner__ring support-banner__ring--outer" aria-hidden="true" />
      <span className="support-banner__ring support-banner__ring--middle" aria-hidden="true" />
      <span className="support-banner__ring support-banner__ring--inner" aria-hidden="true" />
      <span className="support-banner__ring support-banner__ring--center" aria-hidden="true" />

      <div className="support-banner__content">
        <div className="support-banner__title" id={titleId} role="heading" aria-level="2">Still have questions?</div>

        <div className="support-banner__copy">
          <span className="support-banner__line">Our team is happy to help. Start a live chat using the</span>
          <span className="support-banner__line">
            chat bubble <span className="support-banner__chat-icon" aria-hidden="true" /> in the bottom right, or email us at
          </span>
          <span className="support-banner__line">
            <a href="mailto:support@fillout.com">support{'@'}fillout.com</a>
          </span>
        </div>

        <a className="support-banner__cta" href="mailto:support@fillout.com">Contact us</a>
      </div>
    </div>;
};

## What is Dropbox?

[Dropbox](https://www.dropbox.com/) allows users to store documents, photos, videos, and more in your personal cloud storage space, eliminating the need for physical storage devices.

## Video tutorial

<iframe src="https://www.youtube.com/embed/9btbb2SAtY0?feature=oembed" title="YouTube video player" frameborder="0" allow="accelerometer; autoplay; clipboard-write; encrypted-media; gyroscope; picture-in-picture" allowFullScreen loading="lazy" scrolling="auto" width="100%" height="420" />

## How it works

<Steps>
  <Step title="Link your Fillout form to Dropbox">
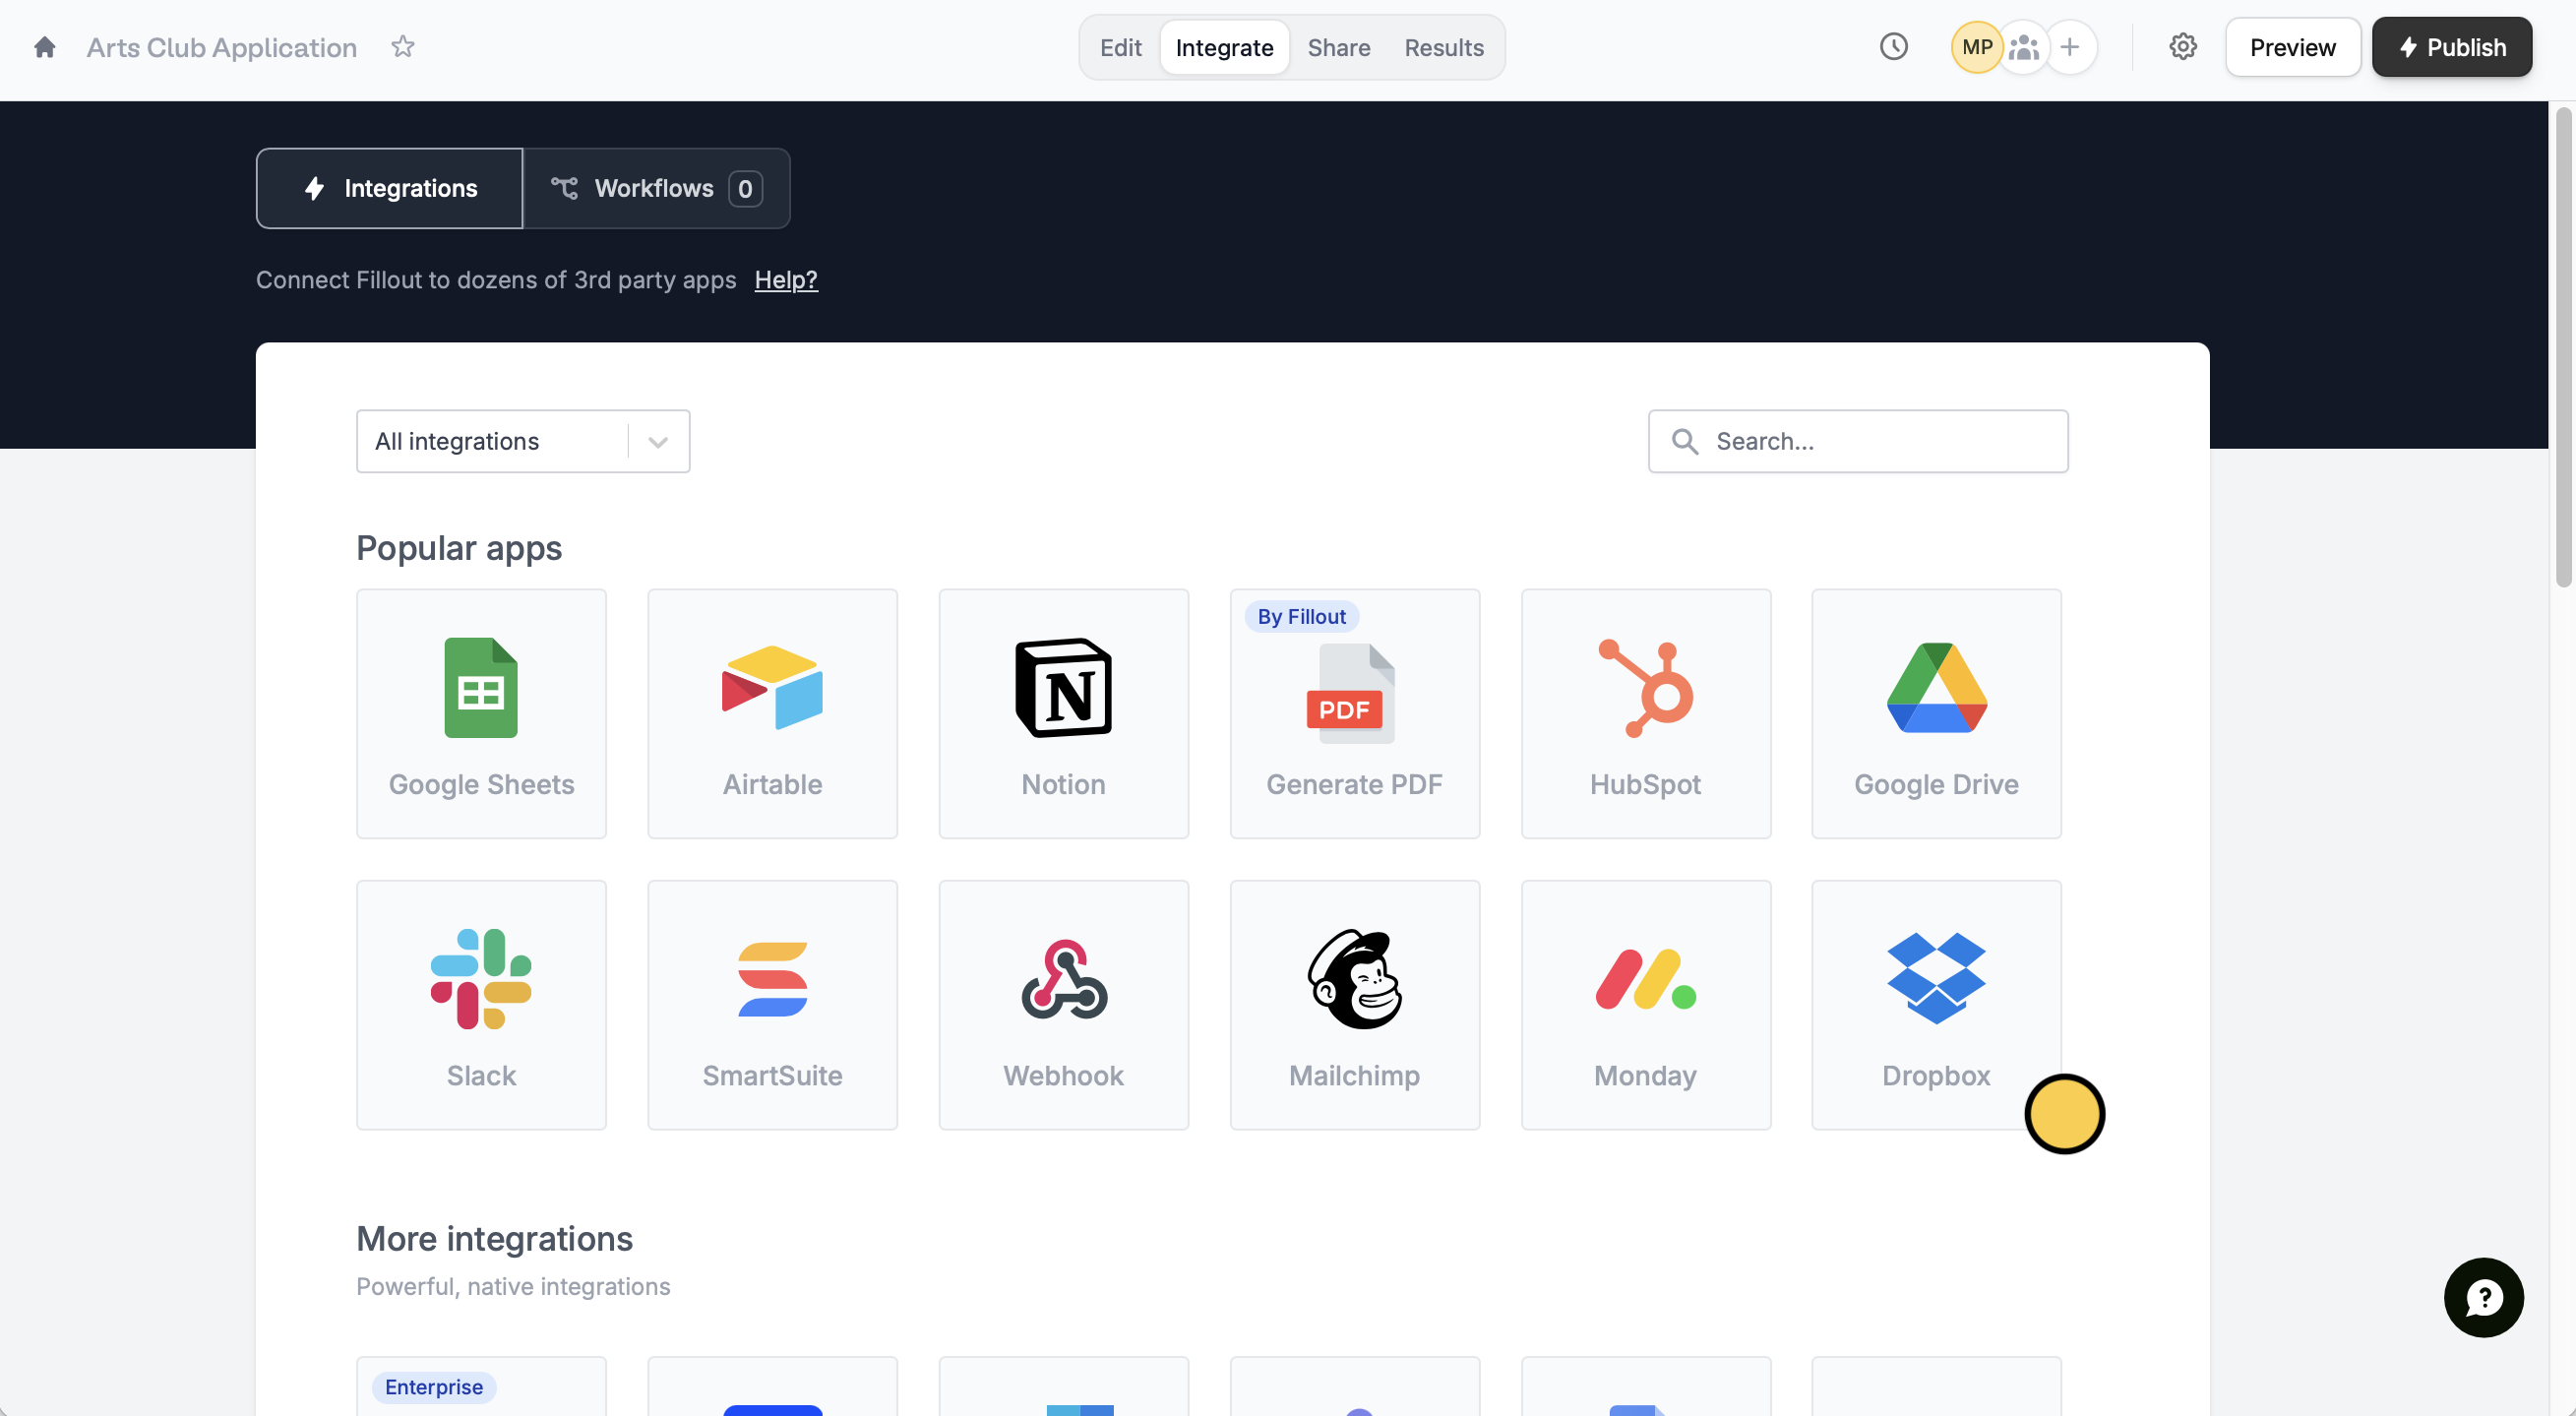
    Go to `Integrate` from the top menu and click `Dropbox`.

    <img src="https://mintcdn.com/fillout-005a867b/hxazQot_xoezmiKA/images/Screenshot2025-11-17at3.14.06PM.png?fit=max&auto=format&n=hxazQot_xoezmiKA&q=85&s=60e3e1d8a7ea7bc45178147d6907ad9d" alt="Screenshot 2025-11-17 at 3.14.06 PM.png" width="2618" height="1439" data-path="images/Screenshot2025-11-17at3.14.06PM.png" />

    <Warning>
      This integration is only applicable to **file uploads**. When creating your form, make sure you have at least one file upload field.
    </Warning>

    Add a name for your connection, then `Connect to Dropbox`.
  </Step>

  <Step title="Map form fields">
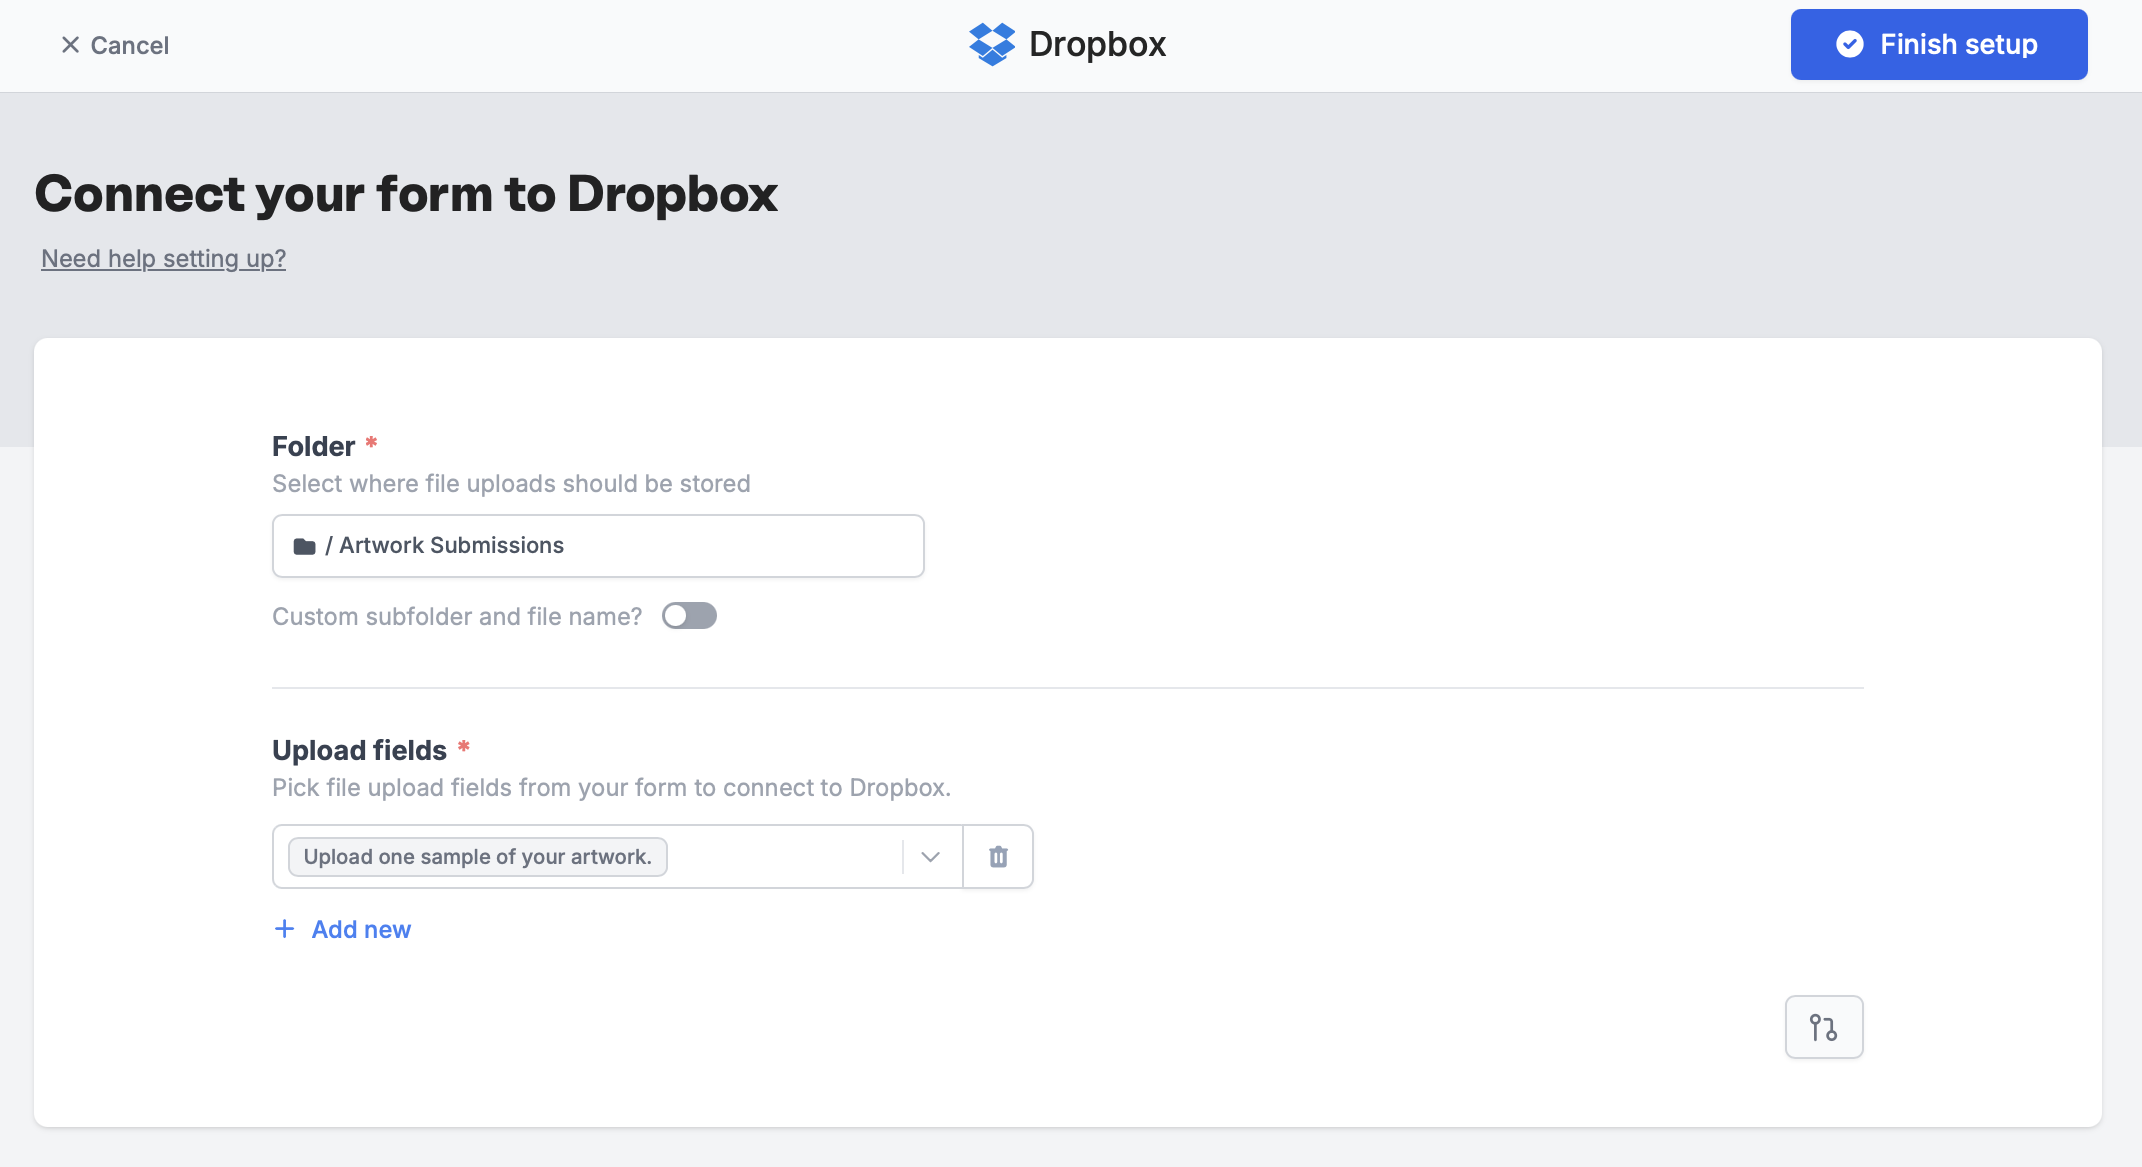
    Choose which **Folder** you would like to store the files in. Under **upload fields**, `+ Add new` and select a **file upload field** from your form.

    <img src="https://mintcdn.com/fillout-005a867b/h_QfN-F56vlvgBC6/images/Screenshot2025-02-17at11.17.43AM.png?fit=max&auto=format&n=h_QfN-F56vlvgBC6&q=85&s=10bd6d868c1016381272957304bc2923" alt="Screenshot of the Fillout form creation page" width="2142" height="1167" data-path="images/Screenshot2025-02-17at11.17.43AM.png" />
  </Step>

  <Step title="Publish and share">
    Once everything is set, click `Finish setup` on the upper right corner. That's it! Your form's good to go. `Publish` to reflect changes and share the link.
  </Step>
</Steps>

## Add a dynamic file path

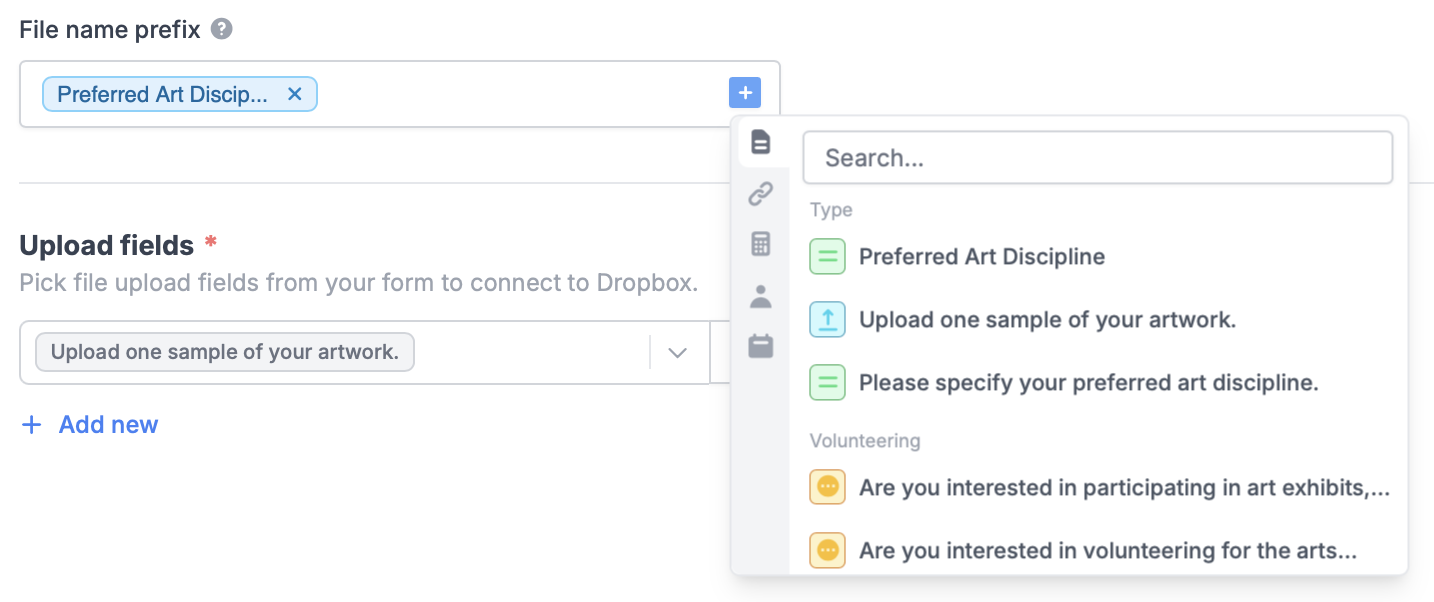
Categorize file uploads into folders based on respondent input. Toggle the `Custom subfolder and file name?` switch, then select a **Folder path fragment**. Enter text or click <Icon icon="square-plus" iconType="solid" /> to [map a field](https://www.fillout.com/help/additional-integration-mappings#how-to-map-fields-manually) in your form. Let's choose "Name" for this example.

<img src="https://mintcdn.com/fillout-005a867b/h_QfN-F56vlvgBC6/images/Screenshot2025-02-17at11.18.52AM.png?fit=max&auto=format&n=h_QfN-F56vlvgBC6&q=85&s=20fe8be5a97649be45d60eb4365ed0b8" alt="Screenshot of the Fillout form creation page" width="1466" height="686" data-path="images/Screenshot2025-02-17at11.18.52AM.png" />

Now, when a respondent submits a form, their file upload will be stored in a folder under their Name. This means every respondent will have their own folder.

## Add subfolders

You can add a subfolder by typing **/** followed by a name of your choice.

<img src="https://mintcdn.com/fillout-005a867b/h_QfN-F56vlvgBC6/images/Screenshot2025-02-17at11.20.45AM.png?fit=max&auto=format&n=h_QfN-F56vlvgBC6&q=85&s=1365c8013c13f77503c8341597628f14" alt="Screenshot of the Fillout form creation page" style={{ width:"58%" }} width="807" height="155" data-path="images/Screenshot2025-02-17at11.20.45AM.png" />

## Personalized filename prefix

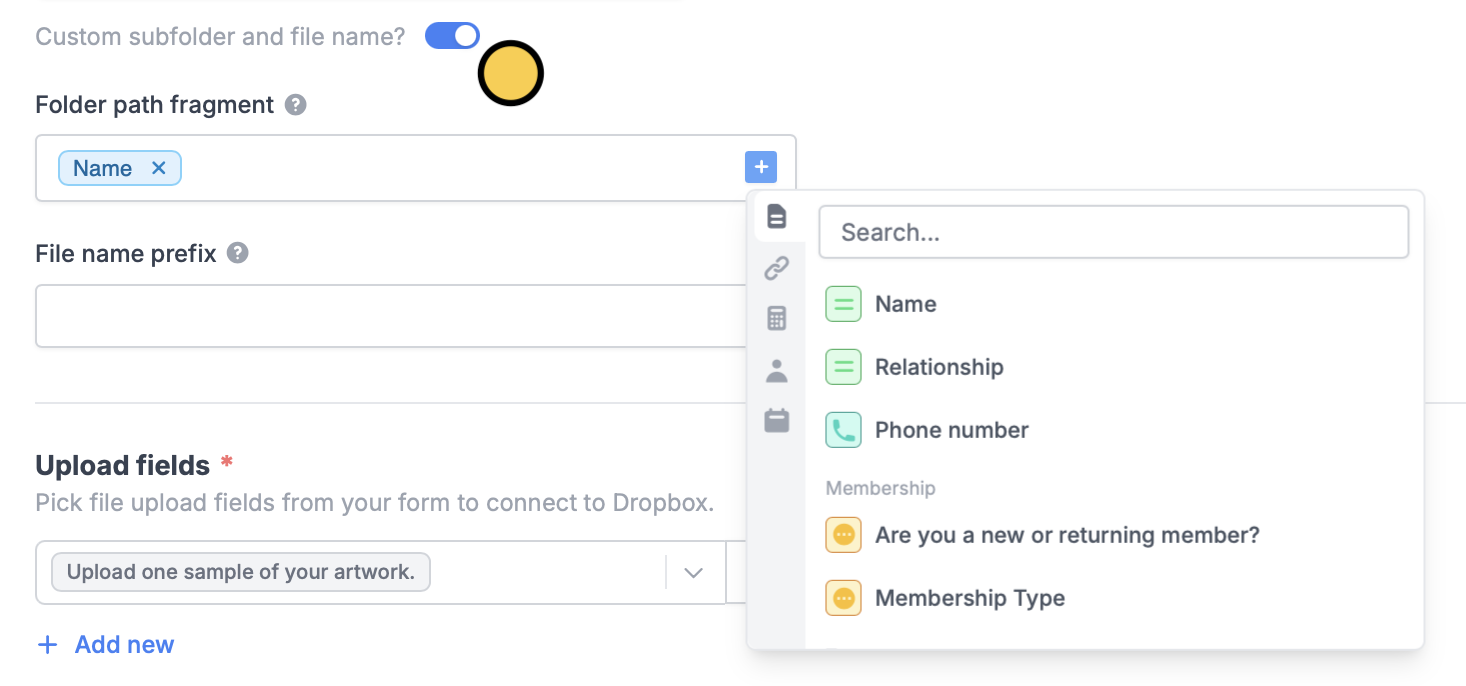
Similar to the steps above, enter text or click <Icon icon="square-plus" iconType="solid" /> to [reference a form field](https://www.fillout.com/help/additional-integration-mappings#how-to-map-fields-manually).

<img src="https://mintcdn.com/fillout-005a867b/h_QfN-F56vlvgBC6/images/Screenshot2025-02-17at11.21.31AM.png?fit=max&auto=format&n=h_QfN-F56vlvgBC6&q=85&s=33b9d5de322a078e1f249c43444545a7" alt="Screenshot of the Fillout form creation page" width="1434" height="602" data-path="images/Screenshot2025-02-17at11.21.31AM.png" />

## Related articles

<CardGroup cols={3}>
  <Card title="Upload files to Google Drive" icon="google-drive" iconType="regular" color="#FFC738" href="/help/google-drive">
    Automatically upload files with a form.
  </Card>

  <Card title="Sync files to Microsoft OneDrive" icon="cloud-arrow-up" iconType="regular" color="#FFC738" href="/help/microsoft-onedrive">
    Automatically upload files with a form.
  </Card>

  <Card title="Sync responses to Monday" icon="columns-3" iconType="regular" color="#FFC738" href="/help/monday">
    Use a form to create leads and more.
  </Card>
</CardGroup>

<SupportBanner />